I’ve been experimenting lately with glass etching:

I’m using Armour Etch brand cream, and for the most part it does a pretty good job. It’s a fairly subtle effect, but can be really striking.
Some caveats for those thinking about tackling a project like this:
- If you aren’t patient and detail oriented with fiddly projects, you may not like your results on this one. (Or the process, for that matter.)
- The more complicated your project is, the more likely it is that you’ll get overwhelmed and quit. It takes longer than you think. Do a small project first to get an idea how long it actually takes you. Then you’ll be more realistic about how hard a big project is.
- Circles are significantly harder than lines. Seriously. (The best advice I have for you there is to move the project itself without lifting the knife and take it slow. And practice. Practice, practice, practice!) Gentle curves aren’t as bad. It’s the full circles that are such a pain — and the smaller, the more painful.
- After you’ve cut your design out, remove the contact paper slowly and carefully, so you don’t stretch it out of shape if you didn’t cut it perfectly and need to go back and clean up your cuts. (It’s vital to properly cut out any little spots where your lines didn’t meet up, because your design won’t be crisp in that spot if you just yank the contact paper until it pulls apart — it will probably pull apart unevenly.)
- Clean the glass really well before you start. Remember that anything (even if you can’t see it with the naked eye) that gets in the way of the acid will affect the quality of your results. You want to make sure you are putting the acid on bare glass, no finger oils or manufacturing byproducts or whatever else. Different glass also may result in better/worse results, so be prepared for that and do a test project if practical. I found Dollar Store glass to take the etching cream pretty well.
- Warning: big areas may not come out totally even looking, and trying to go over it again with a second coat is pretty dicey — maybe you could make it come out if you didn’t remove the template, but the effect doesn’t look the same after the second coat, so you can’t just ‘spot fix.’
- If you’re going to use a knife to cut designs in contact paper like I did, get a good one, not a cheapie. Seriously, I got a new one in the middle of the project, and I hadn’t realized how bad the one I was using was — it was bad even right when I had broken off a fresh tip. (The one I ended up with was a Scotch brand “Titanium” re-loadable one, and I’ve been really happy with it.)
- On the subject of materials, I used clear contact paper from the Dollar Store. Since I haven’t used anything else for ages, I can’t really comment on how it compares. But it was definitely viable for this project. I think it may have been a bit more stretchy than other contact paper because it was see-through. And maybe a bit less sticky than I expected, though it was plenty sticky enough for my project, and it was nice that it was easy to get off when I was done.
- If you use Armour Etch Cream, the official instructions can be found on their website, if you want to look it up. (My bottle didn’t have any instructions on or with it!)
The Good News:
- I found the process to be more forgiving than I thought. I was worried that my lines would have to be laser-cut perfect or it would get blurred or lines would show that I didn’t mean to exist — if I over-cut or otherwise messed up. However, I found that merely being careful and not hurrying and aiming for reasonable precision gave me the effect I wanted. The cream is fairly thick, so it doesn’t really try to escape into places I don’t want it (like under the contact paper or into an over-cut line). It doesn’t really ‘wick’ into unwanted places like thinner liquids might.
- That said, consider getting a throw-away glass jar or bottle out of your recycle bin and trying some triangles, squares, and circles just to see what happens. Make some with the level of accuracy you’re aiming for in your finished piece — and some that you intentionally mess up to see what happens.
- In my experience, when a line ends up a bit longer than I intended, it’s no biggie. I just try to use the back of my fingernail or a popsicle stick to press the area down really hard, trying to sorta ‘seal’ it back together so there is little or no glass exposed. Usually if I do this, I don’t have a problem. No extreme measures needed. After all, a sharp knife just cuts a slit in the material, unlike, for example, a wood saw that might remove an 8th of an inch of material in wood shavings. It’s cutting out shapes in the stencil material that exposes a lot of area, not the cut lines themselves.
That said, on we go:
I used a tall cylinder vase from the Dollar Store and snowflakes I liked from Google. Two were from the same source, and the third (smallest one) was a modification I made to another design that was stylistically similar. (I’m not sharing them here since I didn’t draw them from scratch. Try searching ‘snowflake’ on Google images if you want to find them for yourself.)
I resized and/or modified the snowflakes in Photoshop and printed them out.
You can see below how I arranged the snowflakes on the vase. What you can’t see is that I also brushed the back of the template paper with rubber cement to keep it from moving around while I was cutting out the snowflakes. The tape didn’t do a good enough job for that, though it was helpful in the initial layout.
Here is the photo again:
I took that photo after I had already cut all three snowflakes out, but before I removed the rest of the paper template.

Here it is after the paper was removed, but before I removed the contact paper from the part where the acid would go. If you look closely, the cuts are visible:
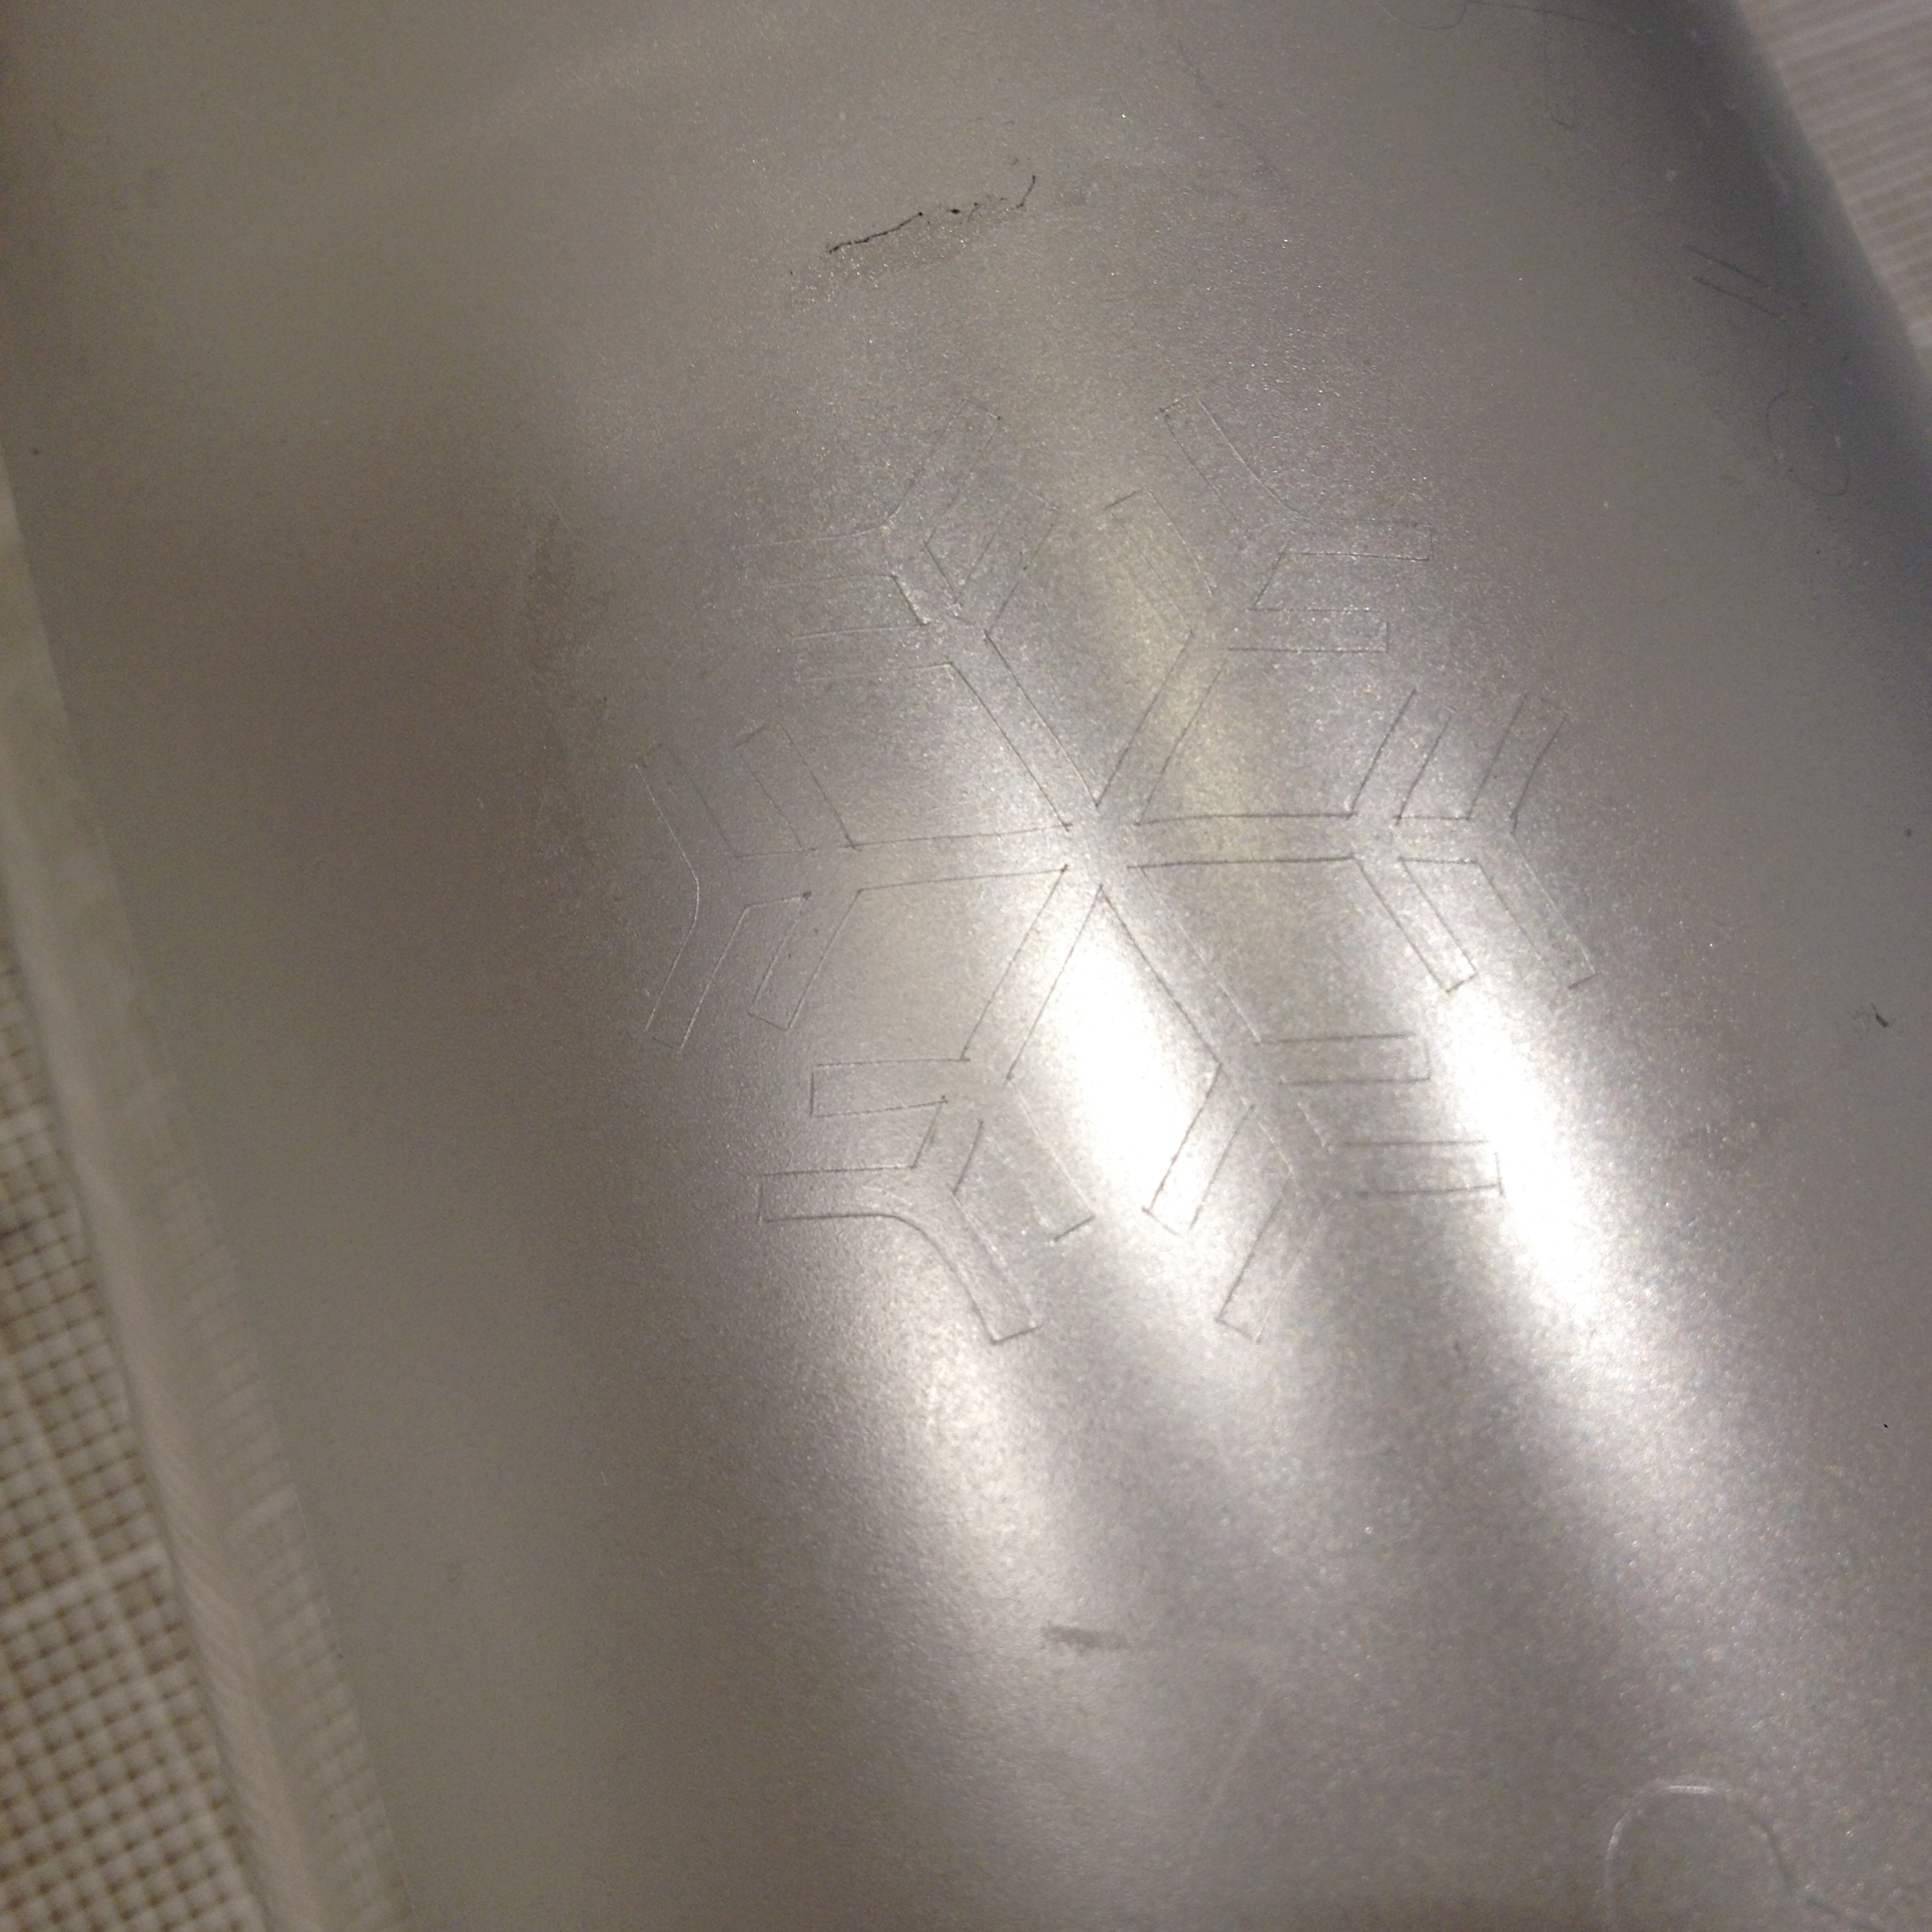
And here it is, held up to the light to check that I got all of the stencil removed. (A very important step!)

At this point, I cleaned the snowflake area with a paper towel soaked in rubbing alcohol. Then I put a piece of paper over the design and ran a popsicle stick over it to smooth things down, to protect the sharpness of my design’s edges and firmly adhere anything that might have been lifted up by the paper towel when I cleaned it.
Without touching the snowflake area, I put it on the counter, braced by potholders to prevent movement. I liberally dosed it with etching cream and let it sit for 5+ minutes (after I got the whole design covered with cream), then scraped most of the used cream back into the jar and rinsed the design off under flowing water in the sink.
A note: You might want to actually make sure the sink isn’t full of dishes before you start this process. Just saying. Not like I’ve ever forgotten to do that, haha… (Shifty eyes).
ANYWAY, here’s the final result:

By the way, it isn’t a trick of the light that the top right snowflake’s center looks a little uneven. It came out that way. Not-totally-even finishes are a risk of using etching cream, and this one isn’t that bad unless you’re looking closely and are a perfectionist. Ha!
Here it is with a lit candle inside (though the effect of the candlelight doesn’t photograph well — it looks much spiffier in real life):
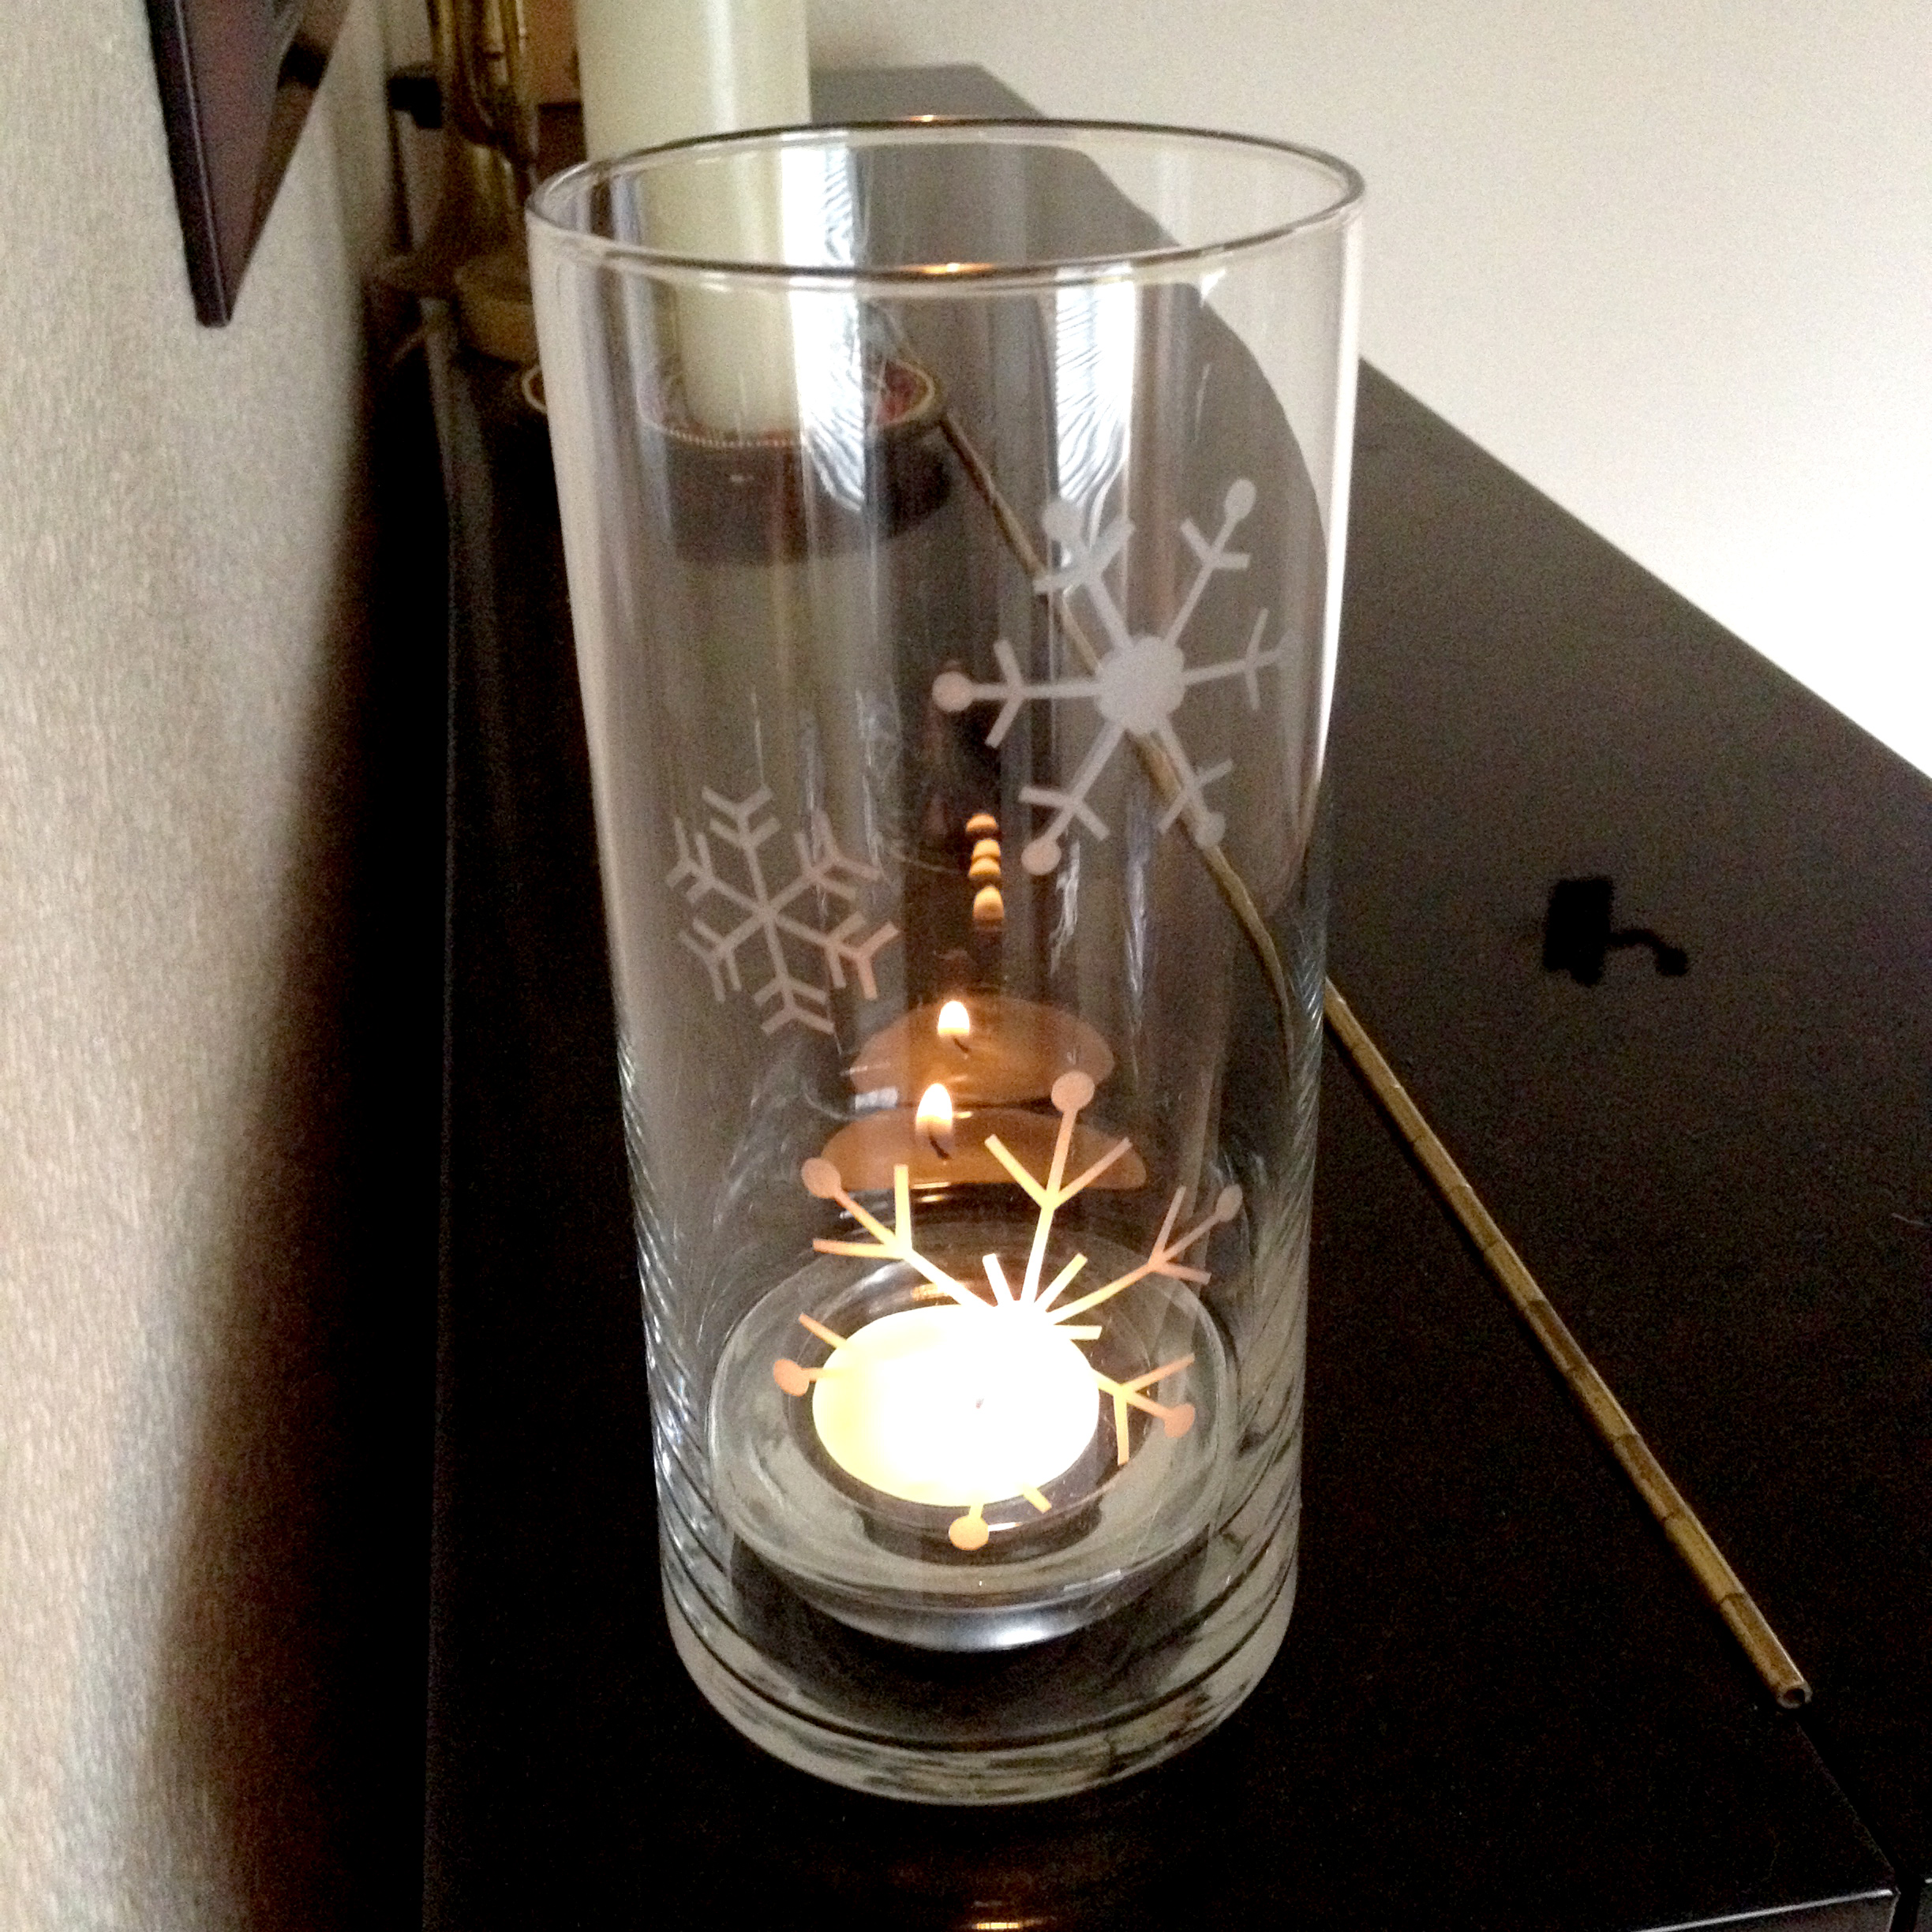
Not bad, if I do say so myself!

Leave a comment